In today’s hygiene-conscious world, maintaining the cleanliness of our dental tools is paramount. Toothbrush sanitizers have gained popularity as essential gadgets for ensuring that our toothbrushes remain as pristine as our smiles.
But what if you could craft your customized toothbrush sanitizer right at home? Yes, you read that correctly! This comprehensive guide will take you through engaging yet practical steps to create your very own toothbrush sanitizer.
Understanding toothbrush sanitizers
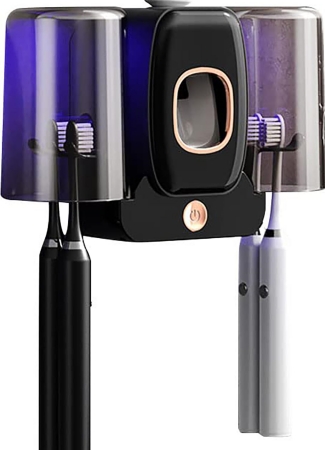
Before we dive into the exciting realm of DIY toothbrush sanitizers, let’s explore the fundamentals. Toothbrush sanitizers primarily utilize UV (Ultraviolet) light technology to eradicate harmful bacteria and germs from your toothbrush. It’s important to note that UV-C light, a specific type of ultraviolet light, is particularly effective for sterilization purposes. Understanding this technology is crucial as we embark on our toothbrush sanitizer-making journey.
Protecting Your Eyes and Skin
Working with UV-C light requires caution to ensure your safety and avoid potential harm to your eyes and skin. Here are some essential safety tips and precautions:
Wear Protective Eyewear: Whenever you are handling the UV-C light source, it’s crucial to wear protective eyewear. This eyewear will shield your eyes from direct exposure to the UV-C light, reducing the risk of eye damage.
Avoid Skin Contact: UV-C light can also harm your skin, so it’s essential to prevent direct contact. Always handle the UV-C light source with care and avoid touching it with your bare hands.
Secure UV-C Light Source: Ensure that the UV-C light source is securely attached to your toothbrush holder or container. Double-check that it won’t move or dislodge during operation to prevent accidental exposure.
Operate Safely: When turning on your toothbrush sanitizer, make sure that it is securely sealed and there are no openings or gaps that could expose you to UV-C light. Always follow the manufacturer’s guidelines for safe operation.
Dispose of Damaged UV-C Bulbs Properly: If the UV-C light source becomes damaged or burned out, it’s essential to dispose of it correctly. UV-C bulbs should not be thrown in regular household waste. Check your local regulations for proper disposal methods, which often include recycling centers or hazardous waste facilities.
By following these safety tips and precautions, you can ensure a safe DIY toothbrush sanitizer project. Your health and well-being are paramount, so always prioritize safety during the creation and use of your toothbrush sanitizer.
Materials You’ll Need
To kickstart your toothbrush sanitizer project, you’ll need a few readily available materials. Don’t worry; these materials are affordable and easy to find. Here’s a list of what you’ll require:
UV-C Light Source: Ensure the UV-C light source you select is suitable for toothbrush sanitization.
Container or Holder: You’ll need a small, clean container or holder where your toothbrush will be placed during the sanitization process.
Power Source: This could be batteries or a USB connection, depending on your preference and convenience.
Switch or Button: A switch or button will facilitate easy on/off operation of your toothbrush sanitizer.
Basic Tools: Have some basic tools on hand for assembly, such as screwdrivers and connectors.
Step-by-Step Guide to Crafting Your Toothbrush Sanitizer
Now that we have all the necessary materials, let’s delve into the process of creating your toothbrush sanitizer. Follow these step-by-step instructions carefully:
Design Planning: Before assembling your toothbrush sanitizer, take a moment to plan its design. Ensure that it comfortably accommodates your toothbrush and the UV-C light source. This is also your opportunity to add a personal touch to the container or holder.
Prioritize Safety: Handling UV-C light requires caution. Always wear protective eyewear when working with the UV-C light source to prevent potential harm to your eyes and skin.
Attach UV-C Light Source: Carefully attach the UV-C light source to your toothbrush holder or container. Ensure that it is securely in place and won’t shift during operation.
Wiring and Switch Installation: Connect the UV-C light source to the power source using appropriate wiring. Install a switch or button to facilitate easy on/off operation.
Testing: Before sealing the toothbrush sanitizer, it’s crucial to test it to ensure that the UV-C light works as intended. Turn it on and observe the sterilization process to confirm its effectiveness.
Seal and Secure: Once you’re satisfied with the functionality, seal your toothbrush sanitizer carefully. Make sure there are no gaps or openings that could expose you to UV-C light during operation.
Power Up: Connect your toothbrush sanitizer to a power source, whether it’s batteries or a USB connection. Place it conveniently, such as near your toothbrush holder, so it becomes an integral part of your daily dental routine.
Regular Maintenance: To keep your toothbrush sanitizer effective, remember to replace the UV-C light source as needed. Consult the manufacturer’s recommendations for replacement intervals to ensure continuous germ-free toothbrushes.
Benefits of a DIY toothbrush sanitizer
Creating your toothbrush sanitizer offers several advantages:
Cost-Effective: DIY toothbrush sanitizers are budget-friendly compared to commercial options.
Customization: You can design your sanitizer to match your preferences and style.
Effective Sterilization: Properly constructed DIY sanitizers can be as effective as commercial ones.
Peace of Mind: Knowing that your toothbrush is free from harmful germs can provide peace of mind.
Fun DIY Project: Building your toothbrush sanitizer can be a fun and educational DIY project.
Additional tips for toothbrush sanitization
In addition to the step-by-step guide, here are some extra tips to enhance your toothbrush sanitization experience:
UV-C Light Exposure Time: The effectiveness of UV-C light depends on exposure time. Consider adding a timer or timer switch to ensure your toothbrush receives the recommended exposure for optimal sterilization.
Compact Design: When designing your toothbrush sanitizer, prioritize a compact and space-saving design. This will make it easier to place it in your bathroom or on your countertop without taking up too much space.
Family-Friendly: If multiple family members use toothbrushes, create a larger toothbrush sanitizer that can accommodate several toothbrushes at once. This promotes a family-wide commitment to oral hygiene.
Educational Element: If you have children, involve them in the DIY process and explain the importance of toothbrush sanitization. This can be a valuable lesson in hygiene for kids.
Spare UV-C Bulbs: Always keep spare UV-C light bulbs on hand. This ensures that you can quickly replace a bulb if it burns out, maintaining the sanitizer’s effectiveness.
Maintaining Your DIY Toothbrush Sanitizer
After successfully creating your toothbrush sanitizer, it’s essential to know how to maintain it for long-lasting functionality. Here are some maintenance tips:
Regular Cleaning: Periodically clean the interior of the sanitizer to remove any dust or debris that may accumulate. A gentle wipe with a soft, damp cloth will do the trick.
Replace UV-C Bulbs: UV-C bulbs have a lifespan, and they lose their effectiveness over time. Refer to the manufacturer’s guidelines for bulb replacement intervals, and make sure to replace them accordingly.
Check Wiring: Inspect the wiring and connections to ensure there are no loose or damaged parts. Proper wiring is crucial for the safe and efficient operation of your sanitizer.
Update Timer Settings: If your sanitizer has a timer, periodically check and adjust the timer settings to ensure your toothbrushes receive adequate UV-C exposure.
Evaluate Seal: Examine the seal and closure of your toothbrush sanitizer. Ensure that it remains airtight to prevent UV-C light leakage during operation.
By following these maintenance tips and regularly caring for your DIY toothbrush sanitizer, you can enjoy the benefits of germ-free toothbrushes for a long time to come.
Conclusion
Congratulations on successfully creating your DIY toothbrush sanitizer! With this handy gadget, you can ensure that your toothbrush remains free from harmful germs, promoting better oral hygiene and a healthier smile. Not only is this project cost-effective and customizable to your preferences, but it also provides peace of mind knowing that your dental tools are clean.
Remember to follow the safety tips when working with UV-C light to protect your eyes and skin. Additionally, regular maintenance, such as cleaning, bulb replacement, and checking the wiring, will keep your toothbrush sanitizer in top-notch condition.
So, say goodbye to germs and hello to a brighter, healthier smile with your homemade toothbrush sanitizer. Happy sanitizing!
FAQs
FAQ 1: How does UV-C light sanitize a toothbrush?
Answer: UV-C light effectively sanitizes a toothbrush by damaging the DNA and RNA of harmful bacteria and germs, rendering them incapable of reproduction. This process ensures that your toothbrush remains germ-free.
FAQ 2: Can I use any UV-C light source for my DIY toothbrush sanitizer?
Answer: While UV-C light is effective for sanitization, it’s essential to choose a UV-C light source designed for toothbrush sanitization. These sources are optimized for the task and provide consistent results.
FAQ 3: How often should I replace the UV-C light bulb in my DIY toothbrush sanitizer?
Answer: The frequency of bulb replacement depends on the manufacturer’s guidelines, but it’s typically recommended to replace the UV-C bulb every 6-12 months for optimal sanitization.
FAQ 4: Are DIY toothbrush sanitizers as effective as commercial ones?
Answer: When properly constructed and maintained, DIY toothbrush sanitizers can be equally effective as commercial options. The key is to follow the construction and maintenance guidelines diligently.
FAQ 5: Can I use my DIY toothbrush sanitizer for multiple toothbrushes?
Answer: Yes, you can create a larger toothbrush sanitizer that accommodates several toothbrushes. This is a family-friendly approach that promotes oral hygiene for all family members.
Share:
Facebook
Twitter
Pinterest
LinkedIn
Natalie Brooks
Natalie Brooks, hailing from Melbourne, Australia, is a home and lifestyle enthusiast with a penchant for curating life's little joys. Her blog is a testament to her love for life, where she reviews and recommends a range of products that enhance daily living. From the soothing ambiance of space lights and the melodic charm of wooden music boxes to the practicality of broom vacuums and UV toothbrush sanitizers, Natalie covers it all. She's particularly fond of her mosquito light during summer evenings, and her hug blanket is a winter staple. Her recent obsessions include the mesmerizing backflow incense burner and a quirky bracelet keychain. With Natalie's insights, readers discover the magic in everyday items.
Tartar and plaque, known as dental calculus, form on teeth when plaque accumulates and starts to harden. Not only is tartar visually unappealing, but it
We are often contacted by customers complaining about a Sonicare toothbrush not charging. A charging issue is a common problem and can sometimes be misdiagnosed
Opting for an electric toothbrush for sensitive teeth can help alleviate discomfort and further protect against gum recession. But which model is ideal for those